How to Inspect Your Property for Erosion and Water Issues
Checking your property for issues with water and soil erosion might sound like a big job, but it doesn't have to be. Think of it like giving your property a regular check-up. At Liberty Hill Septic & Excavation, we specialize in identifying small issues before they become expensive problems. This guide breaks down what to look for, from sediment barriers to drainage systems that keep your property safe. Catching issues early, like a tear in a silt fence or water pooling where it shouldn’t, can save you time and money later on. Let’s keep your property in top condition with regular checks. Contact Liberty Hill Septic & Excavation to schedule your inspection today.
Key Takeaways
- Regular checks are important for spotting soil erosion and water problems before they get serious. At Liberty Hill Septic & Excavation, we know how crucial it is to maintain your property's stability and value. By ensuring your land stays protected, you can avoid costly repairs and potential damage to your foundation. Schedule your inspection now with Liberty Hill Septic & Excavation and let us help preserve the value of your property.
- Look closely at sediment barriers like silt fences for tears or gaps, and check fiber logs for damage. Make sure they're catching dirt, not letting it escape.
- Drainage systems need attention too. Check for blockages in pipes and drains, and see if ponds or ditches are working right without signs of erosion.
- Healthy plants help hold soil. Inspect vegetation for density and health, and check if mats or coverings are in place and secure.
- Keep records of what you find, including photos and weather. Fix issues quickly, starting with the most urgent ones, and document all repairs.
Understanding Erosion Control Inspections
Why Regular Inspections Are Crucial
Think of erosion control inspections like a regular check-up for your property's defenses against soil loss and water damage. It’s not just about ticking boxes; it’s about catching problems before they turn into big, expensive headaches. Regular checks help make sure your property stays put and doesn't wash away. When you let things slide, you risk not only damage to your land but also potential fines if you're in an area with regulations. Plus, keeping sediment on your property means cleaner water downstream, which is a win for everyone.
Here’s why you really don't want to skip these:
- Preventative Care: Spotting a small tear in a silt fence or buildup behind a barrier is easier and cheaper to fix than dealing with a collapsed structure or a massive sediment spill. Trust Liberty Hill Septic & Excavation to provide preventative inspections that ensure your property stays intact and your erosion control system remains in top condition. Reach out to Liberty Hill Septic & Excavation today for a thorough erosion check-up!
- Regulatory Compliance: Many areas have rules about erosion control, especially if you have construction or significant landscaping. Inspections show you're being responsible and can help you avoid penalties.
- Environmental Protection: Soil erosion can carry pollutants into waterways. Keeping your control measures working means you're doing your part to protect local ecosystems.
- Property Preservation: Serious erosion can undermine foundations, damage landscaping, and generally make your property look neglected and less valuable.
"It's best to inspect after any significant weather event, like heavy rain or strong winds, and
also on a set schedule, maybe weekly or bi-weekly, depending on the site's activity and risk level."
Identifying Early Signs of Soil Erosion
Spotting erosion when it's just starting is key. You don't need to be a soil scientist to notice the warning signs. Look for areas where the ground looks disturbed or where water seems to be carving out little paths. Sometimes, you'll see bare patches of soil that weren't there before, especially on slopes or near drainage areas. It might look like small rills or gullies forming, or maybe just a general thinning of the grass or ground cover. If you notice sediment collecting where it shouldn't be, like at the bottom of a slope or near a storm drain, that's another clue that soil is on the move.
Impact of Erosion on Property Value
Let's be honest, nobody wants to buy a property that looks like it's slowly sliding into the sea. Visible signs of erosion, like gullies, bare patches, or damaged retaining walls, can make a property seem unstable and poorly maintained. This can significantly lower its market appeal and, consequently, its price. Buyers might see the cost of repairs as a major deterrent. Furthermore, if erosion is impacting drainage and causing water to pool, that's another red flag that can lead to foundation issues or mold, further decreasing the property's worth. It's not just about the land itself; it's about the integrity of everything built on it.
Pre-Inspection Preparation and Planning
Alright, before you even step foot on the property to check for erosion or water problems, you got to do a little homework. Think of it like getting ready for a big test – you wouldn't just walk in cold, right? Proper prep makes the whole inspection go way smoother and helps you spot things you might otherwise miss.
Reviewing Site Plans and Documentation
First things first, get your hands on the site plans and any related documents. The Erosion and Sediment Control (ESC) plan is your best friend here. It shows you where all the planned controls are supposed to be and how they're meant to work. It's like a map for the whole system. You'll also want to look at the general site layout, paying attention to things like property lines, how the land slopes, where water might naturally flow, and any existing structures or underground stuff like pipes.
- Site Plans: These show the physical layout, contours, and features.
- ESC Plan: Details the specific erosion and sediment control measures.
- Construction Schedule: Helps understand the current phase of work and potential risks.
- Permits and Approvals: Confirms what measures are required.
It's a good idea to have the approved ESC plan right there on-site during the inspection. This way, if any questions pop up, you can refer to it immediately.
Identifying Priority Areas for Inspection
Once you've got the plans, start thinking about where the real trouble spots are likely to be. You don't want to waste time poking around areas that are perfectly stable. Focus on the places that are naturally more vulnerable. This usually means:
- Steep slopes where water can pick up speed.
- Areas where soil has been recently disturbed or is bare.
- Around water bodies or drainage channels.
- Downhill from construction activity.
- Anywhere you see signs of water concentrating or flowing quickly.
Think about the path water will take across the property. Where does it collect? Where does it rush off? Those are your priority zones. Also, keep an eye on areas where controls might have been damaged or are missing altogether.
Gathering Essential Tools and Safety Gear
Don't show up empty-handed! Having the right gear makes the job easier and safer. You'll want:
- Measuring Tape: For noting the size of issues like rills or sediment buildup.
- Camera or Smartphone: To document everything you find. Take clear pictures!
- Notebook and Pen/Pencil: For jotting down notes, even if you're using digital tools.
- Safety Vest and Boots: Especially if you're on an active site. You need to be seen and protected.
- Gloves: For handling any materials or just keeping your hands clean.
- Waders (if needed): If you anticipate needing to check areas with standing water.
"Being prepared isn't just about having the right equipment; it's about having the right mindset. Knowing what you're looking for and where to look saves a ton of time and makes your inspection much more effective. It's about being systematic and thorough from the get-go."
So, before you start walking around, take a good hour or so to review those plans and get your gear together. It might seem like a drag, but trust me, it makes all the difference when you're out there trying to figure out what's going on with the water and soil.
Inspecting Sediment Barriers and Perimeter Controls
Alright, let's talk about the first line of defense against soil washing away: sediment barriers and perimeter controls. These are the things like silt fences and straw wattles you see around a site. Their job is to catch dirt and debris before it can get into storm drains or waterways.
Checking Silt Fences for Damage and Gaps
When you're looking at silt fences, you want to walk right alongside them. Keep an eye out for any rips, tears, or holes in the fabric itself. These are obvious weak spots. Also, check where the fence meets the ground. If there are gaps, water and sediment can just sneak right underneath. Pay special attention to the ends of the fence, where they connect to stakes or other anchors. These spots can get pulled away, especially after a good rain.
- Look for tears or holes in the fabric.
- Check for gaps between the bottom of the fence and the soil.
- Inspect the stakes and anchors for looseness or damage.
- Note any areas where sediment is piling up significantly against the fence.
Evaluating Fiber Logs and Straw Wattles
Fiber logs and straw wattles are those sausage-like things often placed around the base of slopes or along disturbed areas. They work by slowing down water runoff and trapping sediment. You'll want to see if they're still in place and holding their shape. Sometimes, water can flow right over or around them if they've shifted or settled too much. Check if the stakes holding them down are secure. If the material itself looks like it's breaking down or washing away, that's a sign they aren't doing their job anymore. It's important to make sure these are properly installed to prevent sediment runoff.
Assessing Sediment Buildup Behind Barriers
Seeing some sediment piled up behind a silt fence or wattle is actually a good sign – it means the barrier is doing its job! However, if that pile gets too high, it can actually cause the barrier to fail. Imagine a dam with too much water behind it; it can break. So, you're looking for a moderate amount of sediment. If it's getting close to the top of the fence or wattle, it's time to think about cleaning it out. You also want to check for any signs of the barrier being pushed over or blown out by the pressure of the accumulated sediment.
"The goal with these barriers is to slow water down and trap sediment. If they're damaged, clogged, or overwhelmed, they can't do that effectively, leading to more erosion problems down the line. Regular checks are key."
Evaluating Drainage Systems and Water Flow
After you've checked out your sediment barriers, it's time to look at how water is actually moving around your property. This is where you really get to see if your erosion control plan is working, or if water is finding ways to cause trouble.
Inspecting for Blockages and Pollutants
Think of your drainage system like your property's plumbing. If it's clogged, things back up, and that's never good. You'll want to walk along all your ditches, culverts, and storm drain inlets. Look for leaves, trash, or any other gunk that might be stopping water from flowing freely. Sometimes, you might even see oily sheens or strange colors in the water, which could point to pollutants getting into the system. This is a good time to check if any of your stormwater treatment devices are doing their job or if they're just full of muck.
- Check storm drain inlets: Make sure they aren't choked with debris.
- Examine pipes and culverts: Look for blockages or signs of water backing up.
- Observe water clarity: Note any unusual colors or sheens that might indicate pollution.
"Keeping your drainage systems clear isn't just about preventing floods; it's also about protecting local waterways from whatever might be washing off your property."
Verifying Proper Function of Ponds and Basins
If you have retention or detention ponds, they're designed to hold water temporarily, slowing it down and letting sediment settle out. You need to make sure they're still able to do that. Over time, sediment can build up at the bottom, reducing the pond's capacity. Also, check the inlet and outlet structures – are they clear of debris? Are they still directing water in and out like they should?
Identifying Scour Erosion in Ditches
Ditches are meant to channel water, but sometimes the water moves too fast and starts digging into the sides or bottom. This is called scour erosion. You'll see little channels or gouges where the soil has been washed away. If you see a lot of this, it might mean your ditches aren't big enough for the amount of water they're handling, or maybe the vegetation meant to hold the soil in place isn't doing its job. It's a clear sign that water is moving too aggressively and needs to be slowed down.
Assessing Vegetation and Surface Coverings
After you've checked the barriers and drainage, it's time to look at what's actually holding the soil in place – the plants and ground cover. This is often the most natural and cost-effective way to keep things from washing away, but it still needs a good once-over.
Evaluating Vegetation Density and Health
Think of vegetation as your property's natural armor. Healthy, dense plant growth is your first line of defense against erosion. When you're inspecting, look around to see how much of the soil is actually covered by plants. Are there large patches of bare dirt just sitting there, waiting for the next rain? That's a red flag. You want to see a good, thick carpet of green, not a patchy, sad-looking lawn. Also, check if the plants themselves look healthy. Are they wilting, yellowing, or showing signs of disease? Stressed plants aren't going to do a great job of holding onto the soil. Sometimes, the wrong plants are put in for the area, or they just aren't getting enough water or nutrients. It's worth noting if the vegetation seems weak or sickly.
Checking Erosion Control Mats and Anchoring
If you've used erosion control mats, blankets, or netting, you need to see if they're still doing their job. These are usually put down on slopes or in areas prone to washing out. First, check if they're still in place. Sometimes, heavy rain or wind can lift them up or shift them around. Look for any tears, holes, or areas where the material is starting to break down. Make sure the edges and seams are properly secured, and that any stakes or anchors are still holding firm. If the mats are loose or damaged, they're not only ineffective but can actually become a tripping hazard or collect debris. They should be snug against the soil, not flapping in the breeze.
Observing Soil Water Absorption Rates
This one's a bit trickier to check directly during a quick inspection, but you can get a sense of it. The idea is to see how well the soil can soak up water instead of letting it run off. Areas with healthy vegetation and good soil structure tend to absorb water better. If you notice water just sitting on the surface for a long time after a rain, or if you see water pooling in areas where it shouldn't be, that could mean the soil isn't absorbing it well. This could be due to compacted soil, lack of organic matter, or just too much hard surface. You might see this more clearly in ditches or low spots where water collects. It's a sign that water is running off the surface, potentially carrying soil with it.
"When assessing vegetation, don't just look at the green stuff. Think about the soil underneath. Healthy soil, rich in organic matter and with good structure, will support better plant growth and absorb water more effectively. If the soil looks hard, dry, and lifeless, even a lot of plants might struggle, and erosion could still be a problem."
Here's a quick rundown of what to look for:
- Bare Soil Patches: Areas with little to no plant cover.
- Vegetation Health: Wilting, yellowing, disease, or sparse growth.
- Mat/Blanket Integrity: Tears, loose edges, displacement, or degradation.
- Anchoring: Loose stakes, staples, or exposed edges of mats.
- Water Pooling: Standing water on the surface long after rain.
- Surface Runoff: Visible water flowing over the ground, especially carrying sediment.
Identifying Common Erosion and Water Issues
Alright, let's talk about what you're actually looking for when you're out there inspecting. It’s not always obvious, but there are some tell-tale signs that things aren't quite right with your property's erosion control. Spotting these early can save you a ton of headaches and money later on.
Recognizing Damaged Silt Fences
Silt fences are like the first line of defense, right? But they can get pretty beat up. You'll want to look for rips in the fabric – sometimes they look like tears, other times it's just a general sagging. Also, check if the posts are still firmly in the ground or if they're leaning over. Gaps where the fence meets the ground are a big problem too, because that's how sediment escapes. Think of it like a leaky bucket; it's not going to hold water (or sediment) very well.
Spotting Clogged Storm Drain Inlets
These little guys are super important for managing where water goes. If they're full of leaves, dirt, or random construction bits, water can't get through. This causes runoff to back up and find its own path, which usually means it's carving out new erosion channels. It’s especially common after a big leaf drop in the fall or if there's been any digging nearby. You might see water pooling where it shouldn't be.
Detecting Exposed Soil Areas
This is a pretty straightforward one. If you see patches of bare dirt, especially on slopes or after a heavy rain, that's a red flag. Plants and ground cover are your best friends for holding soil in place. When that cover is gone, the soil is just sitting there, waiting to be washed away. You might see little channels forming, or even exposed roots. It’s a clear sign that soil erosion is happening.
Addressing Inadequate Drainage and Pooling Water
Sometimes, the land itself isn't sloped correctly, or something is blocking the natural flow. This leads to water just sitting there, creating puddles. This standing water can weaken the ground over time and start to erode the soil around it. It can also put stress on any structures nearby, like walkways or retaining walls. You want water to move off your property, not hang around.
"It's easy to overlook small issues, but they can quickly grow into bigger problems. A small crack in a concrete structure, a bit of rust on metal components, or a slight lean in a barrier might seem minor now, but water pressure and soil movement can exploit these weaknesses over time, leading to more significant damage. Addressing these early is key to preventing costly repairs."
Structural Integrity of Erosion Control Measures
Examining Concrete Structures for Cracks
When you're out checking your property's defenses against erosion, take a good, hard look at any concrete elements. We're talking about things like retaining walls, headwalls for culverts, or even concrete aprons around drainage outlets. Even small hairline cracks can be a big deal. Water is sneaky; it can get into those tiny fissures, freeze and expand in colder weather, or just slowly wear away the concrete over time. You want to look for any signs of spalling (where chunks break off) or deep fissures. If you see a crack, try to measure it – how wide is it, and how deep does it seem? A little crack today could mean a big problem, like a wall collapsing, down the road.
Checking Walls and Barriers for Instability
Beyond just the concrete itself, check the overall stability of any walls or barriers. Are they leaning or bowing outwards? This is often a sign that the soil behind them is pushing too hard, or that water pressure is building up. Give them a gentle push (if it's safe to do so) to see if there's any wobble. Also, look at the ground right at the base of these structures. Is the soil there looking washed out or sunken? That's a red flag that water is getting underneath and undermining the support. It’s like a wobbly table – you need to fix the legs before the whole thing goes over.
Inspecting Metal Components for Corrosion
Lots of erosion control systems use metal parts – think fence posts, anchors for silt fences, or even parts of larger drainage structures. You need to keep an eye on these for rust. Surface rust might be okay for now, but if you see deep pitting, flaking, or areas where the metal looks thin and weak, that's a problem. Corrosion weakens the metal, making it more likely to bend, break, or fail when it's needed most, especially under pressure from soil or water. It’s a good idea to note down which parts are showing significant rust so you can plan for replacement before they give out completely.
Here's a quick checklist for structural integrity:
- Concrete: Look for cracks (width, depth), spalling, and discoloration.
- Walls/Barriers: Check for leaning, bowing, and erosion at the base.
- Metal Parts: Inspect for rust, pitting, flaking, and thinning.
- Anchoring: Ensure all components are firmly secured and not loose.
"It's easy to overlook the small signs of wear and tear on these structures, but they are the backbone of your erosion control. Addressing minor damage early prevents a cascade of failures that can be much more expensive and difficult to fix later on. Think of it as preventative maintenance for your property's stability."
Performance Evaluation of Control Products
So, you've got all these erosion control gizmos and gadgets in place, right? Great. But are they actually doing their job? That's what this part is all about – checking if your silt fences, wattles, and other stuff are pulling their weight. It’s not enough to just have them; they need to work.
Observing Water Runoff Patterns
After a good rain, take a walk around. Where is the water going? Ideally, it should be guided away from vulnerable spots and slopes, not just pooling up or carving new paths. Look for signs that the water is being managed as intended. Are the channels clear? Is the water flowing towards your retention ponds or drainage areas? If you see water sheeting off a slope in a way that looks like it's taking soil with it, that’s a red flag. It means whatever is supposed to be slowing it down or diverting it isn't quite cutting it.
Looking for Sinkholes and Depressions
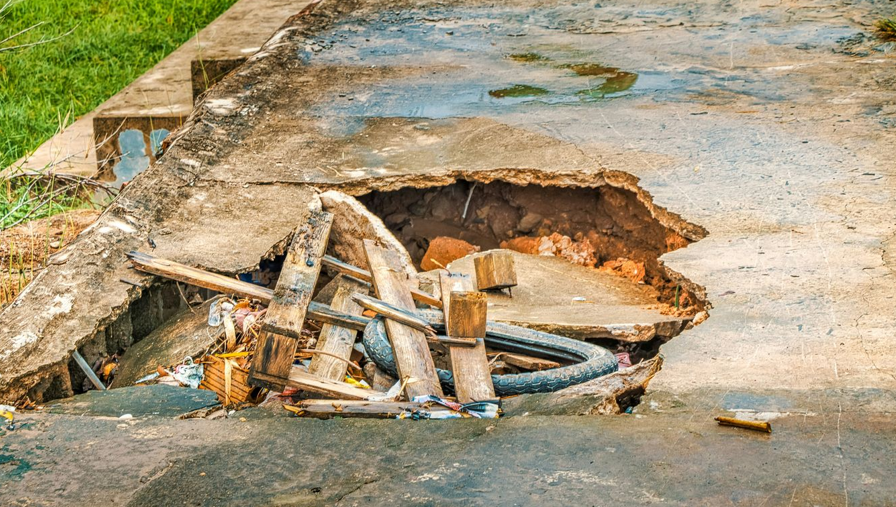
This is a big one. When you see sinkholes or dips forming, especially behind barriers or in areas that should be stable, it’s a pretty clear sign that water is washing away the soil underneath. Think of it like this: the water is finding a way to tunnel through and carry the dirt with it. These aren't just cosmetic issues; they can undermine the whole system and lead to bigger problems down the line. Keep an eye on these spots and note their size and depth.
Ensuring Proper Water Diversion
This ties into the runoff patterns. Are your control products actually diverting water? For instance, if a silt fence is supposed to catch sediment but the water is just flowing right over or around it, it's not doing its job. You need to check that the barriers are positioned correctly and that there aren't any gaps or low spots where water can escape. It’s about making sure the water goes where you want it to go, and stays away from where you don't.
Here's a quick rundown of what to look for:
- Water Flow Direction: Is it going where it's supposed to?
- Sediment Trapping: Is sediment actually being caught behind barriers?
- Slope Stability: Are slopes showing signs of washouts or undercutting?
- Drainage Outlet Function: Are outlets clear and working properly?
"Sometimes, you might see a bit of sediment buildup behind a silt fence. That's actually a good sign – it means it's working! But if that buildup gets too high, it can actually push the fence over. So, it's a balance, and you need to keep an eye on how much is accumulating."
Documentation and Reporting Procedures
After you've walked the property and noted down all the erosion and water issues, the next big step is getting it all written down. This isn't just busywork; it's super important for tracking what's going on and making sure you're covered. Good records are your best friend when it comes to managing your property's health and meeting any local rules.
Detailed Descriptions of Issues Found
Forget vague notes like "fence is broken." Get specific! Instead of saying "silt fence damaged," try something like: "A 10-foot section of silt fence near the back corner is torn, probably from that big storm last week." If you see sediment piling up, measure it. How deep is it? How much area does it cover? If vegetation is sparse, estimate the percentage of ground cover. Details like these paint a clear picture and help you (or someone else) understand the exact problem.
Utilizing Standardized Forms and Digital Tools
Using a consistent format for your notes makes things way easier to compare over time. You can create your own simple checklist or use templates. Many apps and software programs are out there now that let you snap photos, add notes, and even map issues right on your phone. This stuff can automatically organize your findings and even help generate reports. It’s a lot faster than scribbling in a notebook and trying to decipher it later.
Here’s a quick look at what to include:
- Inspection Date: When did you check things out?
- Location: Where on the property was the issue?
- Issue Description: What exactly did you see? (Be detailed!)
- Photos/Videos: Visual proof is powerful.
- Corrective Action Taken: What did you do about it?
- Date of Repair: When was the fix completed?
Recording Weather Conditions and Context
Don't forget to jot down the weather. Was there a big rainstorm recently? High winds? Freezing temperatures? This context is really helpful. For example, a damaged silt fence might be understandable after a major downpour, but if it failed during a light drizzle, that's a different story. Knowing the weather helps explain why certain issues popped up and how effective your controls really are.
"Keeping track of weather patterns alongside your inspection notes provides a vital narrative. It helps explain the performance, or lack thereof, of your erosion control measures and can be critical if you ever need to justify your actions or understand recurring problems. It’s about building a story of your property’s environmental conditions over time."
If you're in an area with specific regulations, like Maryland, they often have strict rules about how often you need to inspect (e.g., every two weeks and after significant rain) and how long you need to keep records (often three years or more). Checking your local requirements is a good idea to make sure you're doing things right.
Addressing Issues and Implementing Repairs
So, you've done your inspection, and let's be honest, you found some stuff. That's totally normal. The important part is what you do next. It's not about finding perfect, it's about fixing what's broken before it gets worse. Think of it like this: you wouldn't ignore a leaky faucet at home, right? Same idea here, just with dirt and water.
Prioritizing Repairs Based on Urgency
Not all problems are created equal, and some need your attention yesterday. Anything that's actively washing dirt into a creek or storm drain? That's top of the list. Seriously, get that fixed within 24 hours if you can. It's not just about keeping your property looking good; it's often a legal thing, and you don't want fines. For smaller things, like a bit of mulch that blew away or a small patch of grass that didn't take, you've got a bit more breathing room, maybe a week or two.
Here's a quick way to think about it:
- Immediate Action (Within 24 Hours):
- Any erosion causing sediment to enter waterways or storm drains.
- Significant breaches in silt fences or barriers.
- Active undermining of structures.
- Short-Term Action (Within 1-2 Weeks):
- Minor gaps in silt fences.
- Areas of exposed soil needing reseeding or mulching.
- Clogged inlets that aren't causing immediate flooding.
- Minor vegetation thinning or repair.
- Routine Maintenance (As Needed/Scheduled):
- Clearing sediment buildup behind barriers.
- Checking and tightening anchors on mats.
- General site cleanup.
Maintaining On-Site Repair Materials
It's a real pain when you find a problem and then have to stop everything to go buy supplies. So, keep a stash of common repair items right there on site. Think extra silt fence material, some stakes, maybe a few sandbags if you're in that kind of area, and definitely some seed or straw. Having this stuff handy means you can often fix small issues on the spot, or at least get a temporary patch in place while you wait for bigger repairs. It also helps to know who your local suppliers are. If you need a big delivery of something, you want to know who to call who can get it to you fast, especially if it's been raining a lot and everyone else is needing the same things.
Documenting All Repair Work
This is the part people sometimes skip, but it's super important. Every single repair you make needs to be written down. What was the problem? What did you do to fix it? When did you do it? Who did the work? What materials did you use? Take pictures before you start and after you're done. This isn't just busywork; it creates a record. It shows you're being responsible, it helps you track what works and what doesn't, and it's really useful if anyone ever asks questions about your erosion control efforts. It's like keeping a logbook for your property's health.
"Fixing things isn't just about the immediate repair; it's about building a history of care and maintenance. This documentation serves as proof of your efforts and provides valuable insights for future preventative measures. It transforms a reactive approach into a proactive one, saving time and resources in the long run."
For all your erosion control and excavation needs, Liberty Hill Septic & Excavation is here to help. Our experts provide thorough property inspections to catch small issues before they become expensive headaches. Don't wait until it's too late – Contact Liberty Hill Septic & Excavation today to schedule your inspection and protect your land from erosion and water damage.
Wrapping Up Your Property Check
So, you've gone through your property, looking for those tell-tale signs of erosion and water trouble. It might seem like a lot, but catching these issues early, like cracks in a wall or water pooling where it shouldn't, can really save you headaches and cash down the road. Think of it like giving your house a regular check-up. Just keep an eye on things, especially after a big storm, and don't hesitate to fix small problems before they snowball. If you're ever unsure or the problem looks too big to handle yourself, calling in a pro is always a smart move. Keeping your property in good shape means less worry for you.
Frequently Asked Questions
Why is it important to check my property for erosion and water problems regularly?
Checking your property often helps you catch small issues, like soil washing away or water pooling, before they become big, expensive problems. It keeps your land looking good and can even help maintain its value.
What are the first signs I should look for that suggest erosion is happening?
Keep an eye out for bare soil patches, especially on slopes, where grass or plants used to be. You might also see small gullies or channels forming where water has run downhill, or notice soil piled up where it shouldn't be, like behind a fence.
How do erosion and water issues affect my property's value?
Serious erosion can damage structures like foundations or driveways, making your property less attractive and more costly to fix. Water problems, like constant flooding or dampness, can lead to mold and structural damage, which definitely lowers property value.
What tools do I need to inspect my property for these problems?
You don't need much! A notepad and pen to write things down, a camera or your phone to take pictures, and maybe a shovel to check soil stability are usually enough. Wearing sturdy shoes and gloves is also a good idea for safety.
What should I do if I find a damaged silt fence or straw wattle?
If you see a tear in a silt fence or a wattle that's moved out of place, it needs fixing right away. These barriers stop soil from washing away, so a damaged one lets dirt escape. You'll need to repair or replace the damaged section to keep it working.
How can I tell if my drainage system is working correctly?
After it rains, watch where the water goes. Does it flow away from your house and buildings smoothly? Or does it pool up in certain areas, like your yard or driveway? Check that gutters and downspouts aren't blocked and that drains aren't full of leaves or trash.
What's the deal with vegetation and erosion control?
Plants are natural erosion fighters! Healthy, dense grass and plants hold soil together with their roots. If you see lots of bare soil or weak-looking plants, they aren't doing their job well, and the soil underneath might be washing away.
If I find a problem, what's the best way to fix it?
For small issues, you might be able to fix them yourself by clearing debris from drains, adding mulch to bare spots, or reinforcing a small area. For bigger problems, like major sinkholes or damaged retaining walls, it's best to call in a professional to make sure it's repaired correctly and safely.